Pool Equipment Pad Size for Homeowners: Leave 3 Inches for Service
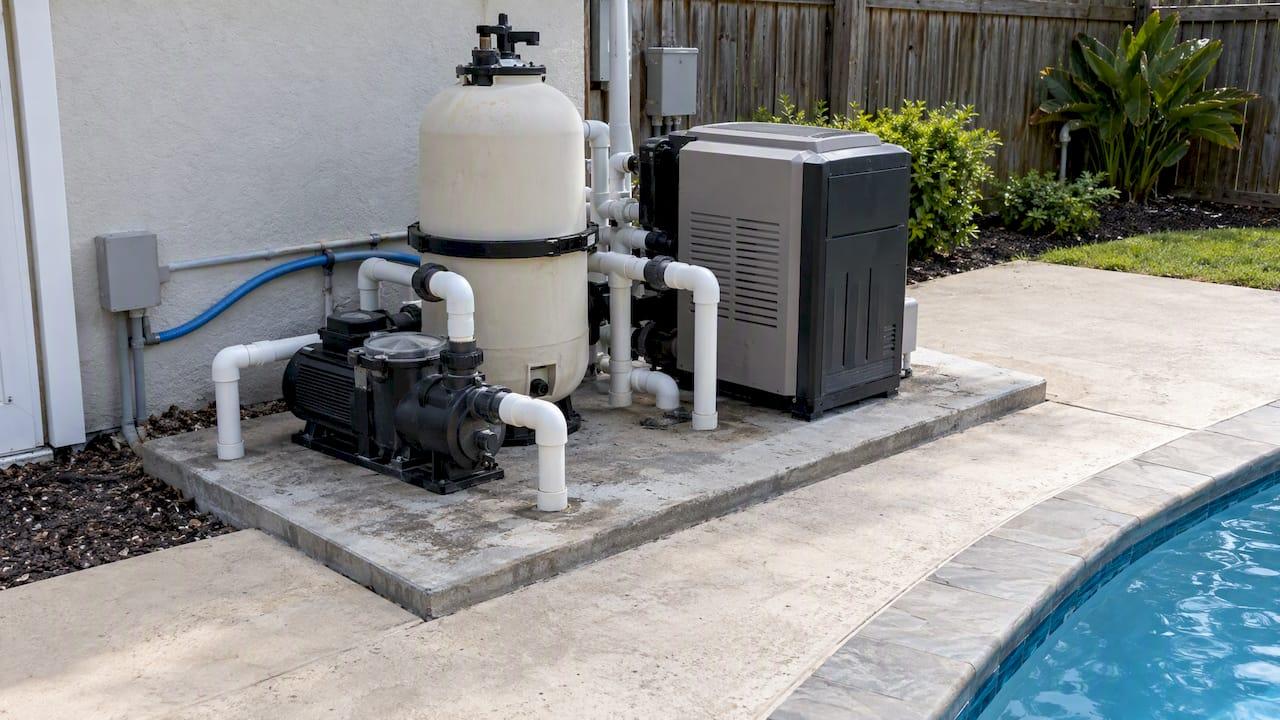
A workable pool equipment pad starts at about 4 feet by 4 feet for the smallest single-pump setups, but most homes need something closer to 4’ x 6’ up to 5’ x 10’ or 5’ x 12’ once a filter and heater join the pump. The real driver isn’t the equipment itself, it’s the clearance you need around it to service, remove, and replace parts without a fight. Thickness, drainage, and compaction underneath the slab matter just as much as the footprint on top.
TL;DR:
- A pump and filter usually fit 4 by 6 to 5 by 8 feet; adding a heater calls for about 5 by 10 feet.
- Allow at least 3 inches beside pumps and 6 inches overhead, with 12 to 24 inches in front for service; follow heater setbacks.
- Use 3 to 4 inches of concrete over compacted base, pitch the slab up to 1/4 inch per foot, and keep buried plumbing accessible.
- Use licensed trades for heater gas connections and electrical panel work, and check local code before pouring because setback and thickness rules can vary.
Table of Contents
- Quick reference: pad sizes and what they fit
- Clearance and manufacturer requirements you must plan for
- Pad materials, thickness, and site prep
- Layout examples and step-by-step footprint calculations
- Installation and serviceability tips that affect pad design
- When to call a pro and what to ask
- Environmental considerations for pad placement
- Impact of local climate on pad size and material durability
- Integration of the equipment pad with pool design and landscaping aesthetics
- Drainage solutions specific to pool equipment pads
- Maintenance access features worth building in
- Cost implications of different pad sizes and materials
- A planning checklist worth keeping on hand
- Pool Estimator: map, measure, and confirm your pad size before you pour
- FAQ
- Sources
Quick reference: pad sizes and what they fit
Before pouring anything, match your equipment list to a footprint that has room to grow. A pad sized only for today’s pump often can’t handle tomorrow’s heater or automation panel.
- Very small single-pump systems: a 4’ x 4’ pad covers a basic pump and little else, suitable for small above-ground pools or spas with minimal filtration needs.
- Typical single-pump plus filter: 4’ x 6’ to 5’ x 8’ gives enough room for a pump, a cartridge or sand filter, and basic service clearance.
- Pump, filter, and heater: 5’ x 10’ is a common starting point once a heater joins the lineup, since heaters need their own combustible clearance zone.
- Multi-pump or multi-feature systems: 5’ x 10’ to 5’ x 12’ or larger accommodates a booster pump, salt chlorine generator, automation panel, and chemical feeders together.
Common preformed pads, like 24 inches by 36 inches or 36 inches by 48 inches, work fine for a single small pump but run out of room fast once you add a filter or heater. If you’re planning automation, a second pump, or chemical feeders down the road, size the pad for that future equipment now rather than pouring a second slab later.
Clearance and manufacturer requirements you must plan for
Manufacturer manuals are the real rulebook here, not guesswork. Pump installation guides from Pentair commonly call for a minimum of 3 inches of side clearance so a technician can pull the motor, plus 6 inches of vertical clearance above it for drive removal.
Clearance basics to build around:
- Side clearance of at least 3 inches around pumps for motor access and disassembly.
- Vertical clearance of at least 6 inches above pump motors for drive and seal service.
- A working radius of 12 to 24 inches in front of major components so a person can kneel, reach tools, and swap parts.
- Larger clearances, often 18 inches to 3 feet, around heaters and heat pumps for combustible-material setbacks.
Manufacturer pump manuals commonly specify 3-inch side and 6-inch vertical clearance minimums, a baseline that shapes how tightly you can pack equipment on a pad. Straight-run suction piping also factors in: pumps perform best with a straight, unobstructed run on the suction side, so cramming a pump into a corner to save pad space can hurt hydraulic efficiency even if it technically fits.
Pad materials, thickness, and site prep
Poured concrete is the standard choice for permanence and load support, typically 3 to 4 inches thick on a compacted base, though local codes may call for more under heavier equipment or in freeze-prone regions. Composite or preformed pads work for lighter, single-pump setups where a full pour feels like overkill.
- Compact the subgrade before pouring. Loose soil settles unevenly and tilts the slab over time, throwing pump alignment and seals out of true.
- Never pour directly over buried plumbing. Route pipes through crushed-stone sleeves or leave an access chase so a future repair doesn’t mean jackhammering the pad.
- Pitch the slab slightly, up to about 1/4 inch per foot, so water runs off instead of pooling around motor housings.
- Anchor heavier equipment per the manufacturer’s bolt pattern, especially in windy regions where heat pumps can shift.
Pro Tip: Order your concrete thickness and mix spec in writing from the contractor before the pour, since “standard slab” can mean different things to different crews.
Layout examples and step-by-step footprint calculations
Start with the biggest piece of equipment, add clearance on every side it needs servicing, then stack the next component against a clearance boundary rather than another piece of hardware.
- Single-pump basic: a pump footprint of roughly 18 by 24 inches plus 12 to 24 inches of working clearance on the service side lands you comfortably inside a 4’ x 6’ pad.
- Pump, filter, and heater: line the pump and filter side by side with their combined footprints around 3 feet wide, then reserve an 18-inch to 3-foot combustible clearance zone beside the heater, pushing the total pad to roughly 5’ x 10’.
- Multi-pump or multi-feature system: add a booster pump or salt generator footprint (another 1 to 2 feet of width) plus its own service clearance, which typically pushes the pad to 5’ x 12’ or larger.
Keep automation panels and gas inlets on the edge of the pad closest to the house or utility connection, not buried behind other equipment, so a technician can reach controls without climbing over pipes.
Installation and serviceability tips that affect pad design
Where you place controls and how equipment sits relative to each other matters as much as total square footage. Pentair’s installation guides recommend mounting electrical controls at the pad itself so you or a technician can operate switches without reaching over equipment lids.
- Mount switches and control panels at an accessible edge of the pad, not wedged between units.
- Keep heat pumps level with or slightly above filter equipment to manage condensation drainage away from other components.
- Follow the manufacturer’s anchor bolt pattern and any local wind-load requirements, particularly for heat pumps in exposed locations.
- Leave a clear walking path to the pad itself, since a pad that’s hard to reach is hard to service regardless of its size.
When to call a pro and what to ask
Some parts of this job aren’t DIY territory. Gas line work, meter or regulator changes, electrical panel modifications, and anything touching complex hydraulics should go to a licensed trade, and local code ambiguity is reason enough to call your building department before you pour.
- Any gas line extension or connection to a pool heater.
- Electrical panel work, including new circuits for pumps or heat pumps.
- Hydraulic layouts with multiple pumps, manifolds, or automation valves.
- Unclear setback or clearance rules in your local code.
When you do hire out, ask directly: what’s the pad thickness and compaction spec, who pulls the permits, what anchoring method will you use, and what clearances are you building to. Fuel gas and electrical codes, including NFPA and NEC provisions, govern heater setbacks and bonding, and your local authority having jurisdiction can add requirements on top of those baselines.
Environmental considerations for pad placement
Where you put the pad on your property affects how long it lasts and how well the equipment inside runs. Direct, all-day sun exposure heats up pump housings and electrical components, which can shorten the life of seals, gaskets, and control boards over the years. A location with partial afternoon shade, from a fence line or a structure rather than overhanging trees, tends to keep equipment running cooler without introducing debris problems.
Proximity to vegetation cuts both ways. Too close to trees or shrubs, and falling leaves, pollen, and root growth can clog filters faster and eventually crack a slab from below. Too far from any wind break, and the pad sits exposed to debris blowing in from the yard. A buffer of a few feet from mature trees, with low groundcover or mulch rather than dense shrubs right against the pad, gives you airflow for component cooling without the leaf litter.
Drainage context matters here too, and maintaining clean hardscape around the pad is essential for longevity and serviceability; check out tips for effective pool deck cleaning. Don’t place the pad where downspout runoff or yard grading naturally channels water, since standing water around the base accelerates concrete deterioration and corrodes anchor hardware. A slightly elevated, well-drained spot away from the lowest point in the yard protects both the slab and what sits on it.
Impact of local climate on pad size and material durability
Climate shapes both the pad’s construction and, indirectly, its size. In freeze-thaw regions, concrete needs a thicker pour and a properly compacted base to resist cracking as the ground shifts seasonally, which is one reason local codes sometimes call for more than the typical 3 to 4 inch minimum. A pad that cracks and heaves doesn’t stay level, and uneven equipment footing leads to premature pump and motor wear.
In hot, high-UV climates, material choice affects longevity more than size. Concrete holds up well under sustained heat, while composite pads can degrade faster under constant direct sun unless they’re rated for it. Heat also means components run warmer, so a slightly larger footprint that allows airflow between units can help dissipate heat rather than trapping it against equipment housings.
Wet or humid climates put more pressure on drainage and anchoring. Saturated ground around the pad base speeds up erosion and settling, and manufacturers’ anchor and tie-down specs become more important in regions prone to heavy storms. None of this necessarily changes the minimum pad size, but it does change how much margin you want to build in: a slightly larger, better-drained, properly anchored pad costs little more up front and avoids problems that are expensive to fix after the fact.

Integration of the equipment pad with pool design and landscaping aesthetics
An equipment pad doesn’t have to look like an afterthought bolted onto the side of the yard. Positioning it in relation to the pool itself, ideally at or below the pool’s water elevation, both improves pump suction performance and keeps the installation closer to the main pool structure, which tends to simplify piping runs and the overall layout.
Screening the pad with a simple fence panel, a low wall, or strategically placed shrubs (kept a reasonable distance back for airflow and service access) keeps the visual focus on the pool and patio rather than on pump housings and pipe fittings. Some homeowners work the pad into a broader landscaping plan, tucking it behind a pool house wall or incorporating it into a side-yard utility zone that also holds trash enclosures or HVAC equipment.
The practical trade-off is access. A pad screened too tightly becomes hard to service, so any aesthetic treatment needs a removable panel, a gate, or an open side that still gives a technician full reach to the equipment. If you’re mapping out where the pad sits relative to the pool, deck, and landscaping before committing to a design, our pool layout ideas page walks through placement examples for different yard shapes and sizes.
Drainage solutions specific to pool equipment pads
Pitch alone doesn’t always solve drainage, particularly on pads with heavier equipment loads or in yards with poor natural runoff. A perimeter drain or a simple trench drain along the low edge of the pad captures water before it pools against the slab, and ties into your yard’s broader drainage system rather than just directing runoff into the lawn.
For pads set into a slope or a low point in the yard, a French drain running along the uphill side intercepts groundwater before it reaches the slab. Channel drains set flush with the pad surface work well when the pad sits close to a patio or walkway, since they catch surface water without creating a tripping hazard.
Keep in mind that heat pump condensation adds a steady trickle of water at the base of that unit specifically, separate from rain runoff. Directing that condensate line to the same drainage channel as the pad’s stormwater, rather than letting it puddle under the unit, keeps the base of the heat pump dry and reduces the corrosion risk on its anchoring hardware.

Maintenance access features worth building in
A pad that’s sized correctly but hard to actually get into defeats the purpose. Leaving a clear, unobstructed path of at least 2 to 3 feet to the pad’s main access side lets you or a service technician bring tools and replacement parts in without maneuvering around landscaping or fencing.
If you’re screening the pad with a fence or wall, a hinged or removable gate section rather than a fixed panel means the whole side opens up for bigger jobs, like pulling a pump or replacing a filter tank. Some setups also benefit from a small utility access point, a separate smaller panel near shutoff valves or electrical disconnects, so routine checks don’t require opening the full enclosure every time.
Labeling shutoff valves and leaving a few extra inches of slack in flexible plumbing connections also pays off during service calls, since it gives a technician room to disconnect a component without having to cut and re-glue pipe.
Cost implications of different pad sizes and materials
A larger pad costs more in concrete and labor up front, but undersizing almost always costs more over the life of the system. The WaterShapes trade article on sizing equipment areas notes that designers and homeowners commonly underestimate space because they add up only the equipment footprints and skip the clearance and service aisles, which leads to add-on work later: extending a slab, relocating a heater, or re-trenching plumbing to fit a part that didn’t have room.
Material choice affects both initial cost and long-term durability. A poured concrete slab typically costs more than a preformed composite pad of the same footprint, but it holds up better under heavier multi-pump systems and resists the cracking that can come with ground movement. Our concrete estimator can help you compare material and thickness costs side by side, while our pool material cost calculator breaks down how equipment pad work fits into your overall pool budget.
The smarter approach is sizing for the system you’ll actually have in three to five years, not just what’s going in this season. A few extra square feet of concrete now is far cheaper than a second pour after you add a heat pump or salt system.
A planning checklist worth keeping on hand
Before you break ground, walk the site with this list: measure your equipment footprints, add clearance on every service side, confirm pad thickness against local code, mark buried lines so you never pour over them, plan where water drains, and have a contractor review the layout before the pour.
Getting this right on paper first is far cheaper than fixing it in concrete.
— Christian
Pool Estimator: map, measure, and confirm your pad size before you pour
Drawing your equipment pad on an actual aerial image of your property, rather than guessing at dimensions on paper, catches sizing mistakes before they cost you a second pour. With our Pool Estimator, we let you draw the pad footprint directly on your property map, place individual equipment elements inside it, and see how your layout holds up against the clearances we covered above.

- Draw the pad boundary and equipment positions on your own aerial map, adjusting dimensions until clearances fit.
- Factor in local cost data so your pad size connects to a realistic budget, not a generic estimate.
- Download a contractor-ready package with your measurements and layout so bids come back based on your actual plan, not a guess.
When you’re ready to turn a pad layout into contractor quotes, start with our Pool Estimator and map your project before you request bids.
FAQ
What are standard pool dimensions?
Standard residential pool dimensions vary widely by shape and yard size, with common rectangular pools varying significantly in size to suit compact yards and larger properties. Equipment pad size is determined separately from pool dimensions, based on the equipment list and clearance needs rather than the pool’s footprint.
Can I get an inground pool for $30,000?
Inground pool costs depend heavily on size, material, site conditions, and local labor rates, so a firm number isn’t something we can state without those specifics. Our pool cost calculator factors in your actual dimensions, equipment, and local pricing to give a realistic range for your project.
How do I pipe a pool heater?
Piping a pool heater typically means tying it into the circulation line after the filter and before water returns to the pool, following the manufacturer’s inlet and outlet markings exactly. Gas line connection and bonding should go to a licensed professional, since heater setbacks and combustible clearances fall under local fuel gas and electrical code requirements.
How do I measure what size pool cover I need?
Measure the pool’s length and width at the widest points, including any irregular curves, and add a few inches on each side for the cover’s anchor or track system. For irregularly shaped pools, a professional measurement is often worth it, since an undersized cover won’t seal properly and an oversized one won’t tension correctly.
What size pad do I need if I’m adding a heater later?
Plan for the larger footprint now rather than later: a pad sized for a pump and filter alone often can’t accommodate a heater’s combustible clearance zone without an expansion. Sizing the pad at 5 feet by 10 feet from the start gives you room to add a heater without repouring concrete.
Sources
- Pentair Max-E Pro pump install manual
- Equipment Pad Best Practices - Trouble Free Pool Wiki
- Fine Points: Sizing equipment areas - WaterShapes