Homeowners: 6 inch Minimum for Retaining Wall Footing Depth & Map Estimates
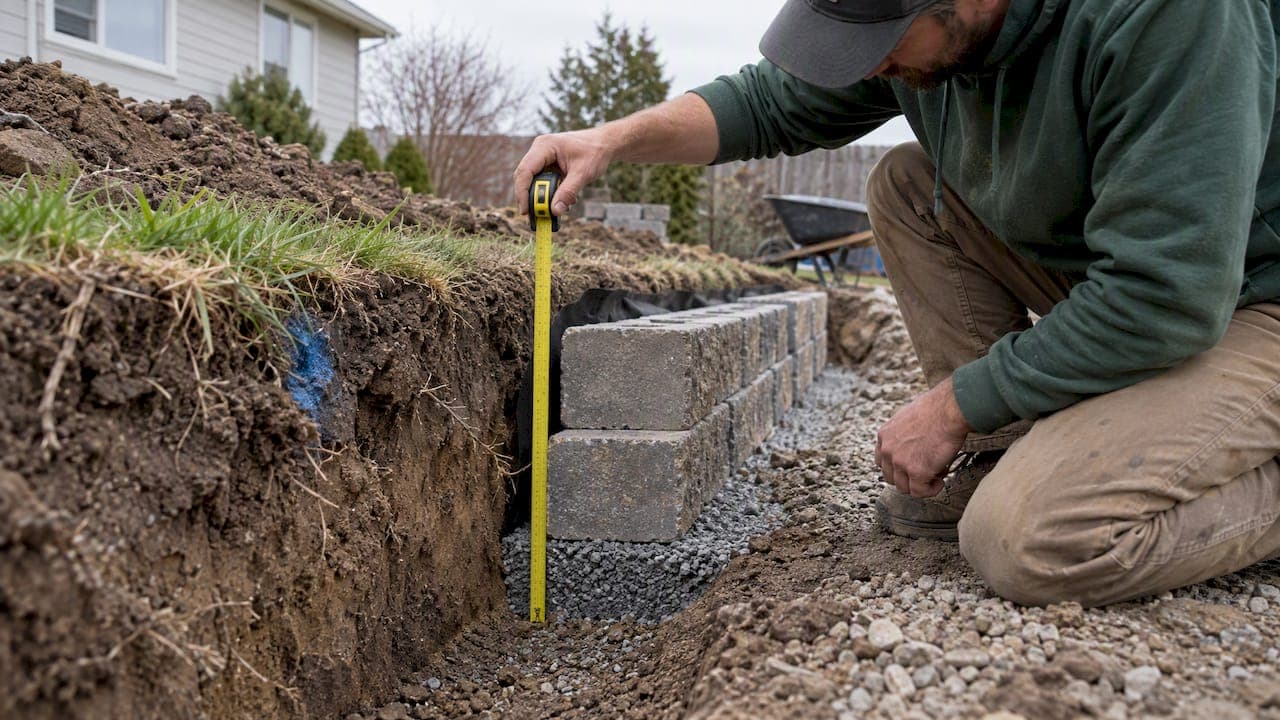
Most segmental retaining walls need a minimum embedment of 6-inch below grade, with gravity and segmental systems commonly using roughly 10% of the exposed wall height as their embedment target, according to Redi-Rock. Leveling pads run a few inches thick, generally between 4 and 6, and trenches typically measure between roughly one and two feet wide. Weak soils, sloped toes, standing water, surcharges, and seismic activity all push those numbers deeper, so manufacturer specs and your local building department should always have the final say.
TL;DR:
- Embedment depth typically starts at 6 inches for short walls, but increases with wall height, slope, soil conditions, and nearby loads.
- Trench width ranges from 18 to 24 inches, with a leveling pad of 4 inches for walls under 4 feet, and 6 inches for taller structures.
- Water management, including proper drainage and outlet placement, is crucial, as it directly affects the foundation’s stability and depth.
- Unstable soils, sloped toes, and standing or flowing water require deeper embedment and specialized engineering to prevent failure.
- Local regulations and site conditions should always be checked before excavation, especially for walls taller than 6 feet or in high-risk environments.
Table of Contents
- Rules of thumb for embedment, trench, and leveling-pad depth
- How soil, slope, water, and loads change the depth you need
- Building the wall: trench, base, first course, and backfill
- Why drainage is part of the footing, not an extra step
- When to call an engineer or pull a permit
- Turning these numbers into a real site plan
- A conservative builder’s take on depth and drainage
- Get your wall estimated before you call a contractor
- FAQ
- Sources
Rules of thumb for embedment, trench, and leveling-pad depth
Three measurements get confused constantly on DIY retaining wall projects: trench depth, leveling-pad thickness, and wall embedment. They are not the same number, and treating them as interchangeable is a common source of DIY installation errors. Embedment is how much of the block face sits below finished grade. The leveling pad is the compacted granular layer the first course rests on. Trench depth is the sum of the two.
The CMHA sets an absolute minimum embedment of 6 inches for segmental retaining walls, with detailed tables showing how that number climbs as toe slope and wall height increase. Allan Block echoes the 6 inch minimum and adds specifics for the leveling pad: 4 inches thick for walls under 4 feet, 6 inches for anything taller. Trench widths generally fall between 18 and 24 inches depending on the block size and wall height, and Allan Block recommends adding roughly 1 inch of embedment for every foot of wall height above 6 feet, under the assumptions laid out in its guidance.
Gravity and segmental systems share a similar logic, but the math differs by wall type:
- Segmental and gravity walls: embedment of about 10% of exposed height, with a 6 inch floor, per Redi-Rock.
- Cast-in-place or cantilever walls: embedment of 33% to 50% of wall height, since these walls rely on a buried footing and heel to resist overturning rather than mass alone.
- Leveling pad thickness: 4 inches for walls under 4 feet, 6 inches for taller walls, per Allan Block.
- Trench width: 18 to 24 inches, adjusted for block dimensions and reinforcement needs.
The gap between segmental and cantilever requirements comes down to how each wall type resists soil pressure. A segmental block wall leans on its own weight and the friction between interlocking units, so a shallow embedment anchors the toe without much engineering. A cantilever wall depends on leverage from a buried footing slab, so shaving inches off that buried footing directly reduces the wall’s ability to resist tipping.
A worked example helps. Say you are building a segmental wall with 3 feet of exposed height on flat ground with good soil. Using Allan Block’s numbers, you would plan for a 4 inch leveling pad plus roughly 6 inches of buried block, giving a trench depth close to 10 inches. A taller wall, say 5 feet exposed, would call for the 6 inch leveling pad and a minimum 6 inch embedment, pushing trench depth toward 12 inches before accounting for any slope or soil adjustments.

How soil, slope, water, and loads change the depth you need
The rules of thumb above assume decent soil, a flat toe, and no extra load on the wall. Real yards rarely offer all three at once, and each deviation has its own fix.
Weak or organic soils compress under load, so a footing that looks adequate on paper can settle unevenly once the wall is built. When you hit soft, peaty, or recently filled soil during excavation, the usual response is to dig past it and replace it with compacted structural fill, or bring in a geotechnical engineer to confirm bearing capacity before you pour or stack anything.
A sloped toe in front of the wall removes soil that would otherwise help resist the base from kicking out, so the fix is usually to either dig deeper or create a level bench ahead of the wall. Allan Block gives practical benching examples, including a roughly 5 foot bench requirement for certain slope ratios, so the base sits on level ground even when the surrounding grade drops away.
Walls near streams, ponds, or tidal areas face scour risk: moving water can strip soil away from the toe over time, undermining a footing that was adequate the day it was built. In these cases, embedment needs to extend below the expected scour depth, and that number is specific enough to the site that it generally calls for a geotechnical or civil engineer rather than a rule of thumb.
Groundwater and seasonal freeze-thaw cycles add a different kind of stress. Water that collects behind the wall and freezes expands, pushing outward on the panels. A base that stays saturated can also lose bearing capacity. Both problems point back to drainage rather than depth alone, which is why getting water out from behind the wall matters as much as how far down you dig.
Finally, surcharges from a driveway, patio, shed, or sloped backfill above the wall increase the lateral force the footing has to resist, and seismic activity does the same. Either condition can push a project past what manufacturer tables cover.
Pro Tip: If your wall sits below a driveway, deck, or anything else with weight on it, treat that load as part of your design from day one rather than something to fix later.

Building the wall: trench, base, first course, and backfill
Once you know your target embedment and leveling-pad thickness, the sequence below turns those numbers into an actual hole and a stable base.
- Confirm your numbers first. Check the manufacturer’s installation sheet for your specific block or system, measure the exposed wall height (H) you are planning, note any toe slope, and flag anything that might count as a surcharge, like a nearby patio or driveway.
- Check permit triggers before you dig. Many jurisdictions require permits or engineering above a certain wall height, so confirm with your local building department before breaking ground.
- Calculate trench depth. Trench depth equals leveling-pad thickness plus buried block height. For a 3 foot exposed wall using Allan Block’s numbers, that is a 4 inch pad plus about 6 inches of buried block, for a trench close to 10 inches deep and 18 to 24 inches wide.
- Excavate and remove organic material. Dig to your calculated depth and width, and strip out any topsoil, roots, or loose fill so the leveling pad sits on firm, undisturbed soil or engineered fill.
- Place and compact the leveling pad. Spread a granular base material (typically crushed stone) to the full pad thickness, then compact it in place. A pad that is not properly compacted will let the first course settle unevenly later.
- Set the first course. Lay the base row of blocks directly on the compacted pad, checking level and alignment across the full run before moving on. Every course above depends on this one being right.
- Fill cores and backfill in lifts. Fill hollow block cores and the area behind the wall with wall rock, and backfill in controlled lifts rather than one deep pour, compacting each lift per the manufacturer’s limits, consistent with Allan Block’s installation guidance.
- Install drainage as you build, not after. Add your perforated drain pipe and free-draining aggregate during backfilling, not as an afterthought once the wall is finished.
- Check your work as you go. Confirm level and alignment every few courses, watch for any shifting or bulging, and stop to call a professional if the soil looks unstable or the wall starts leaning during construction.
A detailed excavation and material breakdown is easier to plan with a retaining wall estimator that lets you enter your wall height and slope directly rather than estimating by eye.
Why drainage is part of the footing, not an extra step
A footing can be perfectly sized and still fail if water builds up behind the wall. Drainage is not a finishing touch, it is a load-bearing decision that affects how deep and how robust your base needs to be.
- Outlets matter as much as the pipe. Drainage needs somewhere to go, whether that is day lighting out the side of a slope or tying into a storm line, so plan the outlet before you backfill.
- Filter fabric near weep holes and outlets keeps fine soil from clogging the drainage system over time.
- Trapped water becomes a design load. Without proper drainage, a wall must be engineered to resist full hydrostatic pressure, a significantly higher force than well-drained backfill produces, per CMHA and INDOT guidance.
Skipping drainage does not just risk a soggy yard. It can mean your 6 inch embedment and standard leveling pad are no longer enough, because the wall is now resisting forces the original design never accounted for. A partner resource on backyard drainage projects walks through some of the slope and foundation solutions homeowners use alongside their walls.
When to call an engineer or pull a permit
Local rules vary enough that a quick check with your building department is worth the phone call before you touch a shovel. Some jurisdictions treat short walls as permit-exempt while others set specific footing depth requirements regardless of height, so there is no single national rule to rely on.
That said, a few conditions generally point toward hiring an engineer rather than following a manufacturer’s standard tables:
- Wall height over 6 feet exposed, where loads and failure consequences both increase.
- Soft, organic, or unknown soil conditions that need actual bearing-capacity testing.
- A sloped toe or sloped backfill steep enough that standard benching tables do not clearly apply.
- Surcharges from driveways, structures, or parked vehicles near the top of the wall.
- Waterfront exposure, high groundwater, or known seismic activity in your area.
Before that call, document the wall’s intended height and length, photograph the site and any slope, and note anything that will load the top of the wall. A retaining wall permit cost calculator can help you compare what different jurisdictions typically require before you file anything.
Turning these numbers into a real site plan
Rules of thumb get you close, but your actual yard has its own slope, soil, and access constraints. Mapping your property lets you draw the wall where it will actually sit, enter the exposed height and slope, and see embedment and base volumes scaled to your site rather than a generic example.
The Retaining Wall Estimator and the retaining wall material cost calculator turn those inputs into material quantities, excavation volumes, and local labor estimates. Pairing that with a Local Project Report gives contractors drawings and measurements upfront, which cuts down on back-and-forth before a quote.
A conservative builder’s take on depth and drainage
If I had to boil this down to three checks before anyone breaks ground: confirm your soil is solid, confirm your toe is level or properly benched, and confirm you have a real drainage outlet. Depth matters, but a dry, well-drained base forgives small errors that a saturated one never will.
— Christian
Get your wall estimated before you call a contractor
You can draw your retaining wall directly on your property map, set the exposed height and slope, and see material and excavation quantities scaled to your actual site, not a generic example.

That same plan becomes a Local Project Report you can hand straight to contractors, so quotes come back based on your real dimensions instead of a guess over the phone.
| What you get | Where it comes from |
|---|---|
| Embedment and base volume estimate | Retaining Wall Estimator, using your mapped height and slope |
| Material quantities (block, aggregate, drain pipe) | Retaining wall material cost calculator |
| Contractor-ready project packet | Local Project Report with drawings and measurements |
Start your layout with the Retaining Wall Estimator and generate a report contractors can quote from directly.
FAQ
What is the 1/3 rule for retaining walls?
Definitions vary by source and wall type, so there is no single universal “1/3 rule.” Cantilever and cast-in-place walls commonly use embedment in the 33% to 50% range of total wall height, which is close to a third, according to Redi-Rock.
Does a 2 foot retaining wall need a footing?
Yes, even short segmental walls need a proper leveling pad and minimum embedment, typically 6 inches, per CMHA. Local permit rules for walls this short vary widely, so check with your building department before you dig.
What is the rule of thumb for retaining wall footings?
A common starting point is 6 inches of minimum embedment for segmental walls, with gravity and segmental systems often targeting about 10% of exposed wall height, according to Redi-Rock. Leveling pads run 4 inches for walls under 4 feet and 6 inches for taller walls, per Allan Block.
Does a 4 ft retaining wall need drainage?
Yes, drainage is treated as part of the foundation design regardless of wall height, with free-draining aggregate and a perforated drain pipe recommended behind the units, per the Fairfax County guide. Without it, the wall may need to be engineered for full hydrostatic pressure instead of standard backfill loads.
Sources
- Proper embedment guidelines for retaining wall construction | Allan Block
- Segmental retaining wall design - CMHA
- Determine retaining wall embedment depth for more accurate final project costs | Redi-Rock
Recommended
- Retaining Wall Cost Calculator | Height, Drainage, Soil, and Local Costs
- Retaining Wall Labor Cost Calculator | Height, Excavation, Drainage, Backfill, Access, and Local Wages
- Retaining Wall Estimate Calculator | Height, Drainage, Excavation, and Local Factors
- Retaining Wall Material Cost Calculator | Block, Timber, Stone, Drainage, Geogrid, and Local Factors