Homeowners: Map Your Retaining Wall Drainage and Choose Filter Fabric
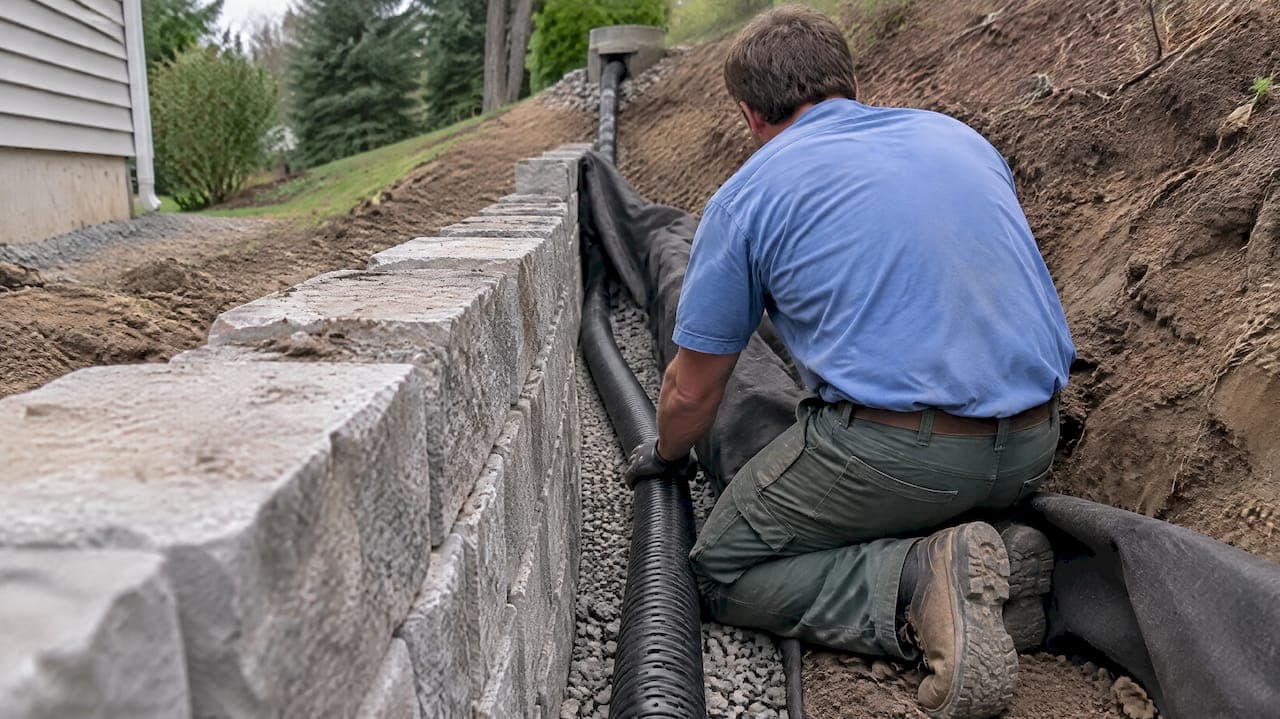
Every retaining wall needs a way to move water out of the soil behind it: a footing drain at the base, 12 to 24 inches of free-draining gravel, a filter fabric wrapping that gravel, and an outlet that actually discharges the water somewhere useful. Skip any one of these and you are building a dam, not a wall. If your wall has no visible weep holes or pipe outlet, that is your first thing to check today.
TL;DR:
- Proper drainage components, including footing drains and gravel backfill, are essential to prevent hydrostatic pressure that can cause wall failure.
- Install or retrofit drainage by excavating, lining with filter fabric, placing perforated pipes, and ensuring outlets are accessible and unobstructed.
- Site conditions like clay, silty, or high groundwater require larger pipes, more gravel, and possibly multiple drains to effectively manage water flow.
- Using the correct pipe size, gravel depth, and geotextile fabric significantly extends the lifespan of the drainage system and reduces clogging risks.
- Walls taller than 3 feet or near problematic soil and water conditions should involve professional engineering and geotechnical assessments.
Table of Contents
- Why hydrostatic pressure makes drainage non-negotiable
- Step-by-step: installing or retrofitting wall drainage
- How soil type and site conditions change the design
- Pipe sizes, gravel depth, and fabric specs that actually work
- Common drainage mistakes and how to spot trouble
- When a wall needs an engineer, not a weekend project
- Mapping your drainage plan before you call a contractor
- A homeowner’s honest take on DIY drainage work
- Plan it once, quote it right with a property improvement estimating tool
- Where this guidance comes from
- Sources
- FAQ
Why hydrostatic pressure makes drainage non-negotiable
Water trapped behind a retaining wall does not just sit there. Saturated soil pushes against the wall with force that dry soil never would, and that lateral push, known as hydrostatic pressure, is the leading cause of retaining wall failure. Drainage exists for one reason: to relieve that pressure before it tips, cracks, or bulges the wall.
A few components work together to do this:
- Footing drain: a perforated pipe laid at the base of the wall, set in gravel, that collects water and carries it to an outlet.
- Free-draining gravel backfill: clean, angular crushed stone placed against the back of the wall so water moves down instead of pooling.
- Filter fabric: a geotextile layer, typically non-woven, that keeps fine soil particles out of the gravel and pipe so they do not clog over time.
- Weep holes and daylight outlets: openings low on the wall face or a pipe run that exits at a lower point on the property, giving the collected water somewhere to go.
Weep holes alone do little good if the material behind them is just native soil. According to a practical installation guide from Family Handyman, weep holes only work when there is free-draining gravel or a pipe behind the wall feeding them. Without that, the holes stay dry while water finds another way out, usually through cracks or over the top.
Most residential walls perform well with a single footing drain tied to one outlet. Taller walls, or walls holding back a slope that collects runoff from a larger area, sometimes need a second drain line or a larger-diameter pipe to keep up with volume.
Step-by-step: installing or retrofitting wall drainage
Before any digging, call your utility locator service and check whether your wall height or excavation depth triggers a permit. Many jurisdictions require a permit once a wall passes a certain height, and some require engineered drawings at that point.
- Mark utilities and shore the excavation if you are digging more than a couple of feet deep or working near an existing wall footing.
- Excavate to the base of the wall, sloping the trench floor roughly 1% toward your chosen outlet point, whether that is a daylight exit downslope, a dry well, or a tie-in to a storm drain.
- Line the trench with filter fabric, letting enough material hang over the sides to wrap fully over the finished gravel later.
- Place the perforated pipe at the base, perforations down or to the sides depending on the manufacturer’s instructions, and connect it to the outlet run.
- Backfill with clean, angular gravel in lifts, compacting lightly as you go rather than dumping it all at once.
- Fold the fabric over the top of the gravel before finishing with topsoil and grading the surface away from the wall.
- Test the system by running a hose into the backfill and watching for flow at the outlet, then monitor again after the first real rainstorm.
Pro Tip: Keep a few extra feet of filter fabric at the trench edges. Trimming it short is one of the most common reasons gravel drains silt up within a year or two.
How soil type and site conditions change the design
The baseline drainage described above assumes reasonably well-drained soil. Several site factors push you toward a heavier design:
- Sandy soil drains fast on its own, so the baseline gravel and pipe setup is usually enough.
- Silty soil sheds fine particles that can clog geotextile over time, so a sand layer placed upstream of the fabric helps catch silt before it reaches the pipe.
- Clay soil holds water and drains slowly, which means more gravel, a wider trench, or a second drain line is often worth the extra cost.
- High groundwater or a nearby spring calls for redundant drainage, since a single pipe and outlet may not keep pace.
According to Purdue University’s technical research on filter performance, geotextile selection should match the soil’s grain-size distribution, and pairing a sand layer with the fabric in fine, silty soils reduces clogging risk considerably. If your site has visible springs, a history of standing water, or a slope steep enough that cut-and-fill work is involved, that is a reasonable point to bring in a geotechnical evaluation rather than guess.
Pipe sizes, gravel depth, and fabric specs that actually work
Most residential footing drains use 4 inch perforated pipe, which handles typical runoff volumes for walls under 4 feet. Taller walls or large drainage areas sometimes call for a 6-inch pipe or a second parallel line.
- Pipe diameter: 4 inches for standard walls, larger or dual lines for taller walls or heavy runoff areas.
- Gravel depth: commonly at least 12 inches, with Family Handyman’s guidance noting up to 24 inches for clay or poorly drained sites.
- Aggregate type: clean, angular crushed stone, not rounded pea gravel, which compacts and drains less effectively.
- Fabric type: non-woven geotextile, selected by apparent opening size (AOS) to match the soil’s particle size and reduce the chance of fines migrating into the gravel.
The gravel depth you choose matters more than most homeowners expect. Purdue’s technical research found that geotextile survivability and correct AOS sizing both strongly affect how long a filter system resists clogging, which means a well-chosen fabric paired with proper gravel depth can outlast a cheaper setup by years. Slope the drain pipe gently toward the outlet, and choose daylighting on a downslope lot, a dry well where no slope exists, or a tie-in to a storm sewer where local rules allow it.
Common drainage mistakes and how to spot trouble
Most wall failures trace back to a short list of errors:
- Skipping the footing drain entirely and relying on weep holes alone.
- Using too little gravel, or substituting native soil for backfill.
- Choosing the wrong fabric, or wrapping it too tightly against the pipe.
- Letting the outlet get buried, blocked, or buried under landscaping.
Watch for a wall that leans or bulges, backfill that stays visibly wet days after rain, white mineral staining called efflorescence, or water pooling at the base. Pro Tip: A hose test on a dry day tells you more in ten minutes than weeks of watching and waiting. Minor outlet blockages are a weekend fix; a leaning wall or saturated core usually means a rebuild, so inspect the outlet, the visible gravel, and the wall face before a contractor arrives.
When a wall needs an engineer, not a weekend project
Walls under about 3 feet with good soil and a straightforward slope are reasonable DIY territory. Taller walls, any visible leaning or cracking, or sites with springs, heavy clay, or significant cut-and-fill work call for a licensed engineer. A proper geotechnical report should spell out drainage details and, where a permit applies, provide stamped drawings the building department will accept. The IRC’s guidance on surface drainage directs water away from foundations to an approved location and gives local building officials discretion to require a drainage plan or a registered design professional, so check with your jurisdiction before you dig.

Mapping your drainage plan before you call a contractor
The Retaining wall estimator lets you draw the wall’s exact location and length on a satellite map, which turns into quantity estimates for pipe, gravel, and fabric instead of guesswork. Pair it with the retaining wall material cost calculator for material pricing and the retaining wall permit cost calculator to check whether engineered drawings might add fees. Export the drawings and quantities to share with contractors.

A homeowner’s honest take on DIY drainage work
I would DIY a short wall, under 3 feet, in sandy or loamy soil with no signs of groundwater. Anything taller, clay-heavy, or near a slope with runoff history, I would hire a professional. Either way, get permits sorted and work from an accurate, mapped plan before you touch a shovel.
— Christian
Plan it once, quote it right with a property improvement estimating tool
Guessing at gravel volumes or pipe lengths is how drainage budgets run over. The Retaining wall estimator gives you a mapped drawing of your wall and its drainage run, with local cost ranges attached, so contractors bid on your actual project instead of a rough guess.

That packet includes:
- A to-scale drawing of your wall, drain run, and outlet point.
- Material quantities for gravel, pipe, and fabric based on your real dimensions.
- Local cost ranges you can compare across contractor bids.
If you would rather hand the whole thing off, request a local project report and get a contractor-ready packet without building it yourself.
Where this guidance comes from
- Purdue University’s technical report on geotextile filter performance, covering AOS sizing, survivability, and clogging risk in fine soils.
- IRC guidance on surface drainage, covering code requirements for directing water away from foundations.
- Family Handyman’s installation how-to, covering footing drains, gravel depth, and weep hole function.
For a professional installation comparison, Upstate Roofing Pros’ drainage page outlines how contractors handle drain and outlet routing, and homeowners dealing with a wall next to a pool can check this guide on retaining walls by pools for related water management considerations.
Sources
- Filter performance and design for highway drains (Purdue technical report)
- Retaining wall drainage: how to add retaining wall drainage for long-lasting stability
- IRC guidance on surface drainage and directing water away from foundations
FAQ
Does a 3 foot retaining wall need drainage?
Yes. Even short walls hold back soil that gets saturated after rain, and without a footing drain and gravel backfill, that water still builds pressure against the wall. A basic footing drain and gravel backfill are worth the extra work at any height.
Do you need drainage under a retaining wall?
You need drainage behind the wall more than strictly under it, with the footing drain sitting at the base where the wall meets the backfill. This perforated pipe collects water moving down through the gravel and routes it to an outlet before it can build up against the wall.
What happens if a retaining wall has no drainage?
Water collects behind the wall and creates hydrostatic pressure, which pushes the wall to lean, bulge, or crack over time. Left unaddressed, this pressure is a common cause of retaining wall failure, according to Family Handyman’s installation guide.
What is the 1/3 rule for retaining walls?
Definitions vary by source and jurisdiction, so there is no single standardized rule by that name in code guidance. If you have seen it applied to your wall’s embedment depth or batter, check with a local engineer rather than relying on a rule of thumb.