Homeowners: Calculate Deck Post Spacing With IRC R507.5 and DCA-6
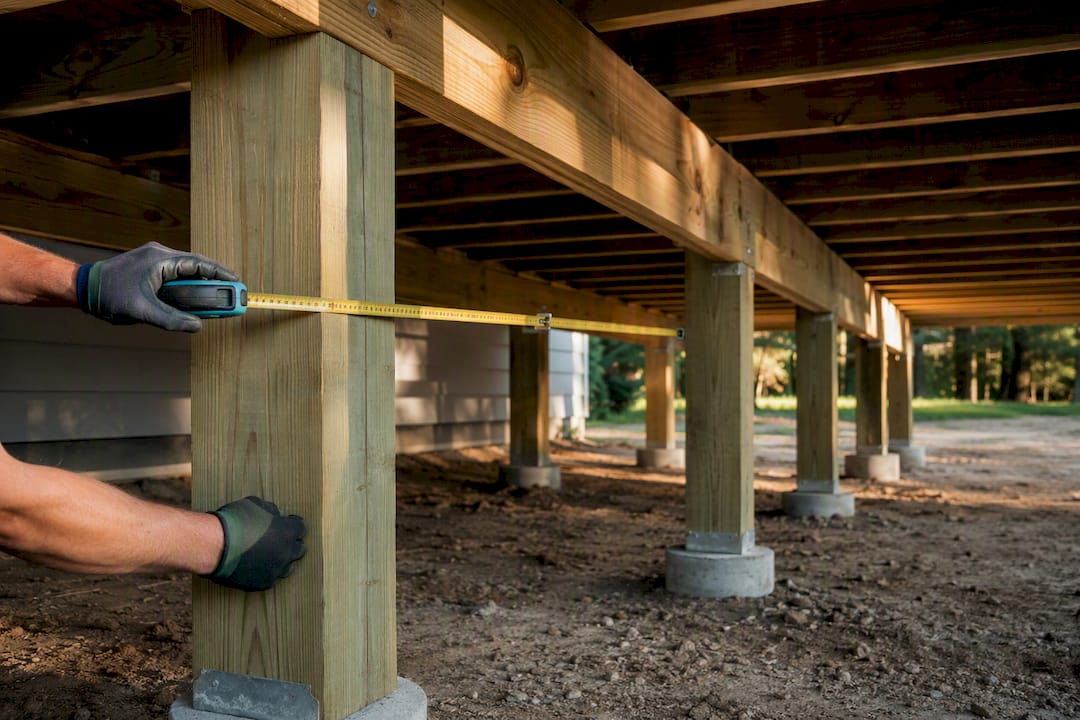
Most residential decks space structural posts 6 to 8 feet apart, with railing posts closer together at 4 to 6 feet. That’s the starting point, not the answer. Your actual number depends on beam size, joist tributary width, lumber species, and load, and the IRC 2021 R507.5 prescriptive cap tops out at 12 feet no matter what. Run your dimensions through a code table or calculator before you dig a single footing.
TL;DR:
- Post spacing depends on beam size, joist span, soil load capacity, and loads exceeding standard occupancy, requiring code-compliant calculations over simple rules of thumb.
- IRC prescriptive standards cap post spacing at 12 feet unless an engineer provides a stamped design for larger spans or unusual conditions.
- Larger posts like 6x6 or 8x8 are typically used for taller decks or higher concentrated loads, but post size mainly affects buckling resistance, not spacing.
- Footing size must match the calculated load and soil bearing capacity, with a minimum of 16 inches for typical loads on soil rated around 1,500 psf.
- Railing posts require tighter spacing of four to six feet to resist lateral loads, and their design should be integrated with the structural grid from the start.
Table of Contents
- Quick Rules Of Thumb Before You Grab A Shovel
- What Actually Determines Post Spacing?
- What Do IRC R507.4/R507.5 And AWC DCA-6 Actually Require?
- Choosing The Right Post Size: 4x4, 6x6, Or 8x8?
- Beam Span And Post Spacing: A Quick Reference
- How To Calculate Post Count, Load, And Footing Size
- Laying Out Post Locations On Site
- Soil, Frost Depth, And Footing Inspections
- Railing Posts Follow Different Rules Than Structural Posts
- When Does A Deck Need An Engineer Instead Of A Table?
- A Field Checklist Worth Following Every Time
- Turn Your Deck Plan Into Contractor-Ready Drawings
- Sources
Quick Rules Of Thumb Before You Grab A Shovel
If you’re standing in your yard trying to figure out whether your plan is reasonable, these ranges will get you most of the way there.
- Structural posts (supporting beams): typically spaced several feet apart on center for standard residential decks.
- Railing posts: usually spaced closer apart because they resist lateral push, not just weight.
- 4x4 posts: suitable for low decks, generally moderate height.
- 6x6 posts: commonly used for most decks of moderate height.
- Post spacing has a maximum cap under prescriptive code. Beyond that, you need an engineer.
A 2-ply 2x10 beam carrying 10-foot joists in Southern Pine typically spans about 7 feet 7 inches between posts — swap in a 3-ply beam or LVL and that number climbs.
Watch for red flags that push you out of standard territory: a hot tub or other concentrated load, a deck wider than 16 feet, soft or clay-heavy soil, or joist spans that are already stretched to their limit. Any one of those can shrink your allowable spacing fast.
What Actually Determines Post Spacing?
Post spacing isn’t a fixed number. It’s the output of a calculation involving three moving parts: how much weight each beam has to carry, how far that beam can safely span between supports, and what the soil underneath can bear.
The key concept is tributary width, the strip of deck that transfers its weight to a given beam or post. If your joists run perpendicular to the house and span 12 feet before hitting the beam, that beam is picking up roughly half that distance, about 6 feet, as its tributary width (assuming a second beam or ledger shares the load). Change the joist direction or span, and you change the load per linear foot hitting the beam. That, in turn, changes how far apart the posts under that beam can safely sit.
The relationship runs inverse: a wider tributary width means more load per foot of beam, which means you need shorter post spacing unless you upsize the beam itself. This is why two decks with identical footprints can call for wildly different post layouts.
AWC’s DCA-6 guide formalizes this with a base-spacing approach:
- Start with a baseline span for a given beam size and species.
- Apply a species multiplier (Southern Pine, Douglas Fir, and Hem-Fir all carry different allowable spans).
- Derate for live load if you’re supporting anything heavier than standard occupancy, like a hot tub.
- Scale by tributary width using an exponent around 0.55, since load doesn’t increase in a straight line as tributary width grows.
Vertical load is only half the story. Posts also need to resist lateral forces, wind, foot traffic pushing the rail, seismic sway, and that’s where connector hardware and blocking come in. A post that’s perfectly sized for downward load can still fail a lateral test if it’s undersized or poorly fastened at the base.
What Do IRC R507.4/R507.5 And AWC DCA-6 Actually Require?
Building departments across the country lean on two documents for deck framing: the International Residential Code and AWC’s supplemental guide.
- IRC R507.5 sets prescriptive beam-to-post span limits based on beam size, species, and joist span, and it caps prescriptive designs at 12 feet between posts.
- Beyond that 12-foot mark, the code no longer covers you. You need a design stamped by a licensed engineer.
- AWC DCA-6 fills in the practical detail IRC leaves out: actual beam tables, species multipliers, and the tributary scaling method that lets you calculate spacing for your specific combination of joist span and beam size.
- Inspectors typically check beam size against the table, ledger attachment and flashing, connector hardware at each post, and footing depth and diameter.
Most inspectors will sign off on a prescriptive design without a fight, as long as you can show your inputs, species, tributary width, live load, match a documented table. That paper trail matters more than people expect.
Choosing The Right Post Size: 4x4, 6x6, Or 8x8?
Post size and deck height are directly linked, and code commentary gives you real thresholds instead of guesswork.
- 4x4 posts: acceptable for low decks, generally 4 feet or less in height, with modest tributary loads.
- 6x6 posts: the standard choice for most residential decks between 4 and 10 feet tall. This covers the vast majority of backyard projects.
- 8x8 posts: reserved for tall decks, heavy concentrated loads, or situations where buckling resistance becomes a real concern.
Height changes the math because a taller post is more prone to buckling under the same vertical load, so code tables reduce allowable spacing or bump up post size as height increases. Ground-contact posts also need to be rated for direct burial, and every post-to-beam connection needs a code-rated connector, not just nails or lag screws driven at an angle.
Pro Tip: Don’t assume a bigger post automatically buys you more spacing room. Post size affects buckling resistance, but the beam above it is usually the limiting factor. Check the beam table first, then confirm your post size matches.
Beam Span And Post Spacing: A Quick Reference
Here’s how common beam assemblies translate into allowable post spacing across a few standard joist spans. These numbers assume Southern Pine and standard residential live loads. Swap in a lighter species and your spacing shrinks.
| Beam assembly | Joist span 8 ft | Joist span 10 ft | Joist span 12 ft |
|---|---|---|---|
| Double 2x8 | ~7 ft | ~6 ft 3 in | ~5 ft 6 in |
| Double 2x10 | ~8 ft | ~7 ft 7 in | ~6 ft 9 in |
| Triple 2x10 | ~9 ft 6 in | ~8 ft 6 in | ~7 ft 6 in |
| LVL or engineered beam | 10 ft+ | 9 ft+ | 8 ft+ |
Two quick examples show how this plays out on real decks:
- 16-foot-wide deck, joists spanning 10 feet: a double 2x10 beam gives you roughly 7 feet 7 inches of post spacing, meaning you’d need three posts along that beam line instead of two.
- 12-foot-wide deck, joists spanning 8 feet: the same double 2x10 beam comfortably spans the full width with just two end posts, no interior post required.
If you’re planning a hot tub or similarly concentrated load, derate your live-load assumption to around 60 psf or higher instead of the standard 40 psf used for typical decks. That single change usually forces tighter post spacing and larger footings, sometimes enough to push you past the prescriptive tables entirely.
How To Calculate Post Count, Load, And Footing Size
Once you know your beam and joist layout, figuring out post count and footing size is arithmetic, not guesswork.
- Calculate tributary width. If joists span 10 feet and there’s a beam on each side sharing the load, each beam typically carries about half that distance, roughly 5 feet.
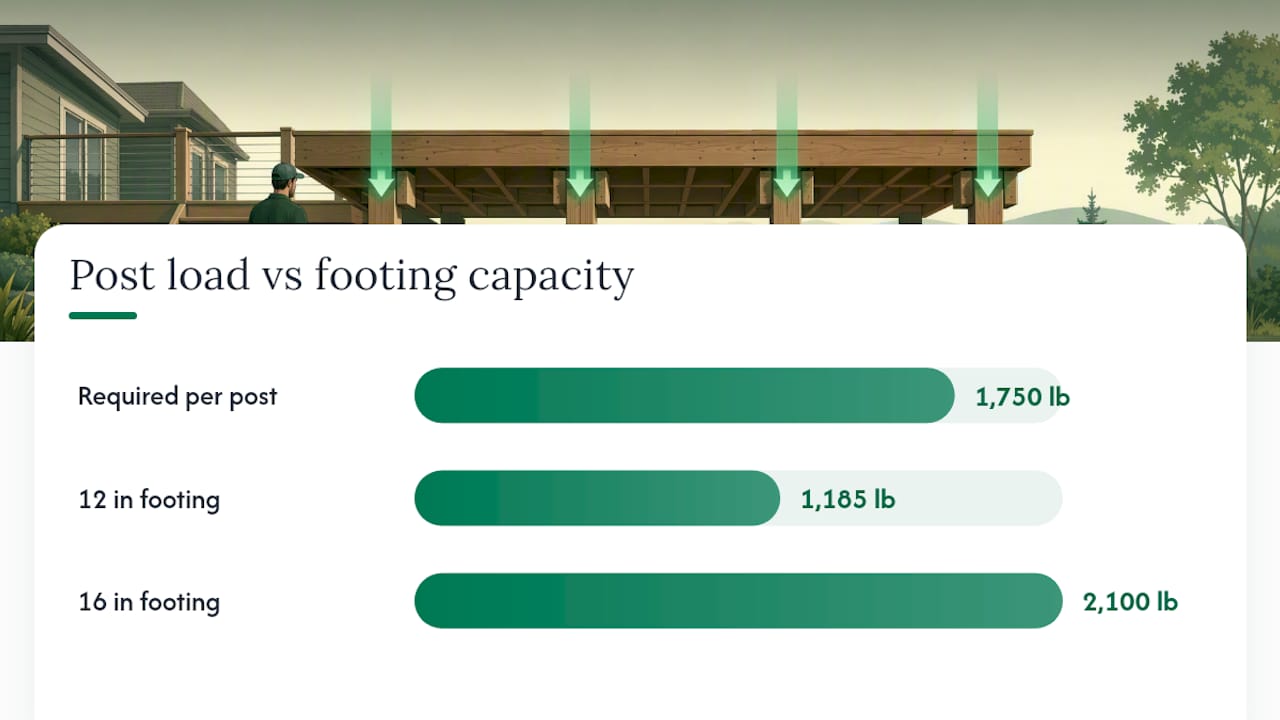
- Multiply tributary width by post spacing and total load. A 5-foot tributary width times 7 feet of post spacing times a combined live and dead load of 50 psf works out to roughly 1,750 pounds per post.
- Compare that load to your footing’s bearing capacity. A 12-inch-diameter footing offers around 0.79 square feet of bearing area. On soil rated at 1,500 psf, that’s about 1,185 pounds of capacity, not enough for a 1,750-pound load.
- Size up the footing. A 16-inch footing (roughly 1.4 square feet) gets you to about 2,100 pounds of capacity on the same 1,500 psf soil, enough headroom to cover the load with a reasonable margin.
- Build in a safety margin. Most designers target at least 20 to 25% of extra capacity above the calculated load rather than sizing footings right to the edge.
A per-post load of 1,750 pounds sounds abstract until you realize it’s roughly the weight of a small car resting on one footing. That’s why footing diameter matters as much as post spacing itself.
If you’re planning a hot tub, add its full water weight plus occupants to the dead load before running this calculation, not just the deck’s own structural weight. Concentrated loads like that often mean tighter post spacing and a larger footing directly under the tub, sometimes as a standalone pad separate from the rest of the framing.
Laying Out Post Locations On Site
Math on paper only helps if you can transfer it accurately to your yard. This is where a lot of DIY decks go sideways, literally.
- Start from the ledger board attached to the house. It’s your fixed reference line for everything else.
- Set batter boards a few feet beyond where each corner post will land, then stretch mason line between them to mark the deck’s outer edges.
- Use a plumb bob to transfer the line intersections straight down to the ground, marking each post’s center point.
- Square the layout using the 3-4-5 method (or 6-8-10 for a larger deck): measure 3 feet along one line, 4 feet along the perpendicular line, and adjust until the diagonal between those points measures exactly 5 feet.
- Before digging, call your local utility locator service, remeasure your diagonals to confirm square, and check clearance from the house foundation and any setback lines.
Getting this step wrong by even an inch compounds across a 16-foot beam line. Take the extra ten minutes to double-check your diagonals.
Soil, Frost Depth, And Footing Inspections
Footing diameter isn’t just about the load on top. It’s about what’s underneath. Soil bearing capacity varies enormously: soft clay might rate around 1,500 psf, while dense sandy or gravel soil can handle 3,000 psf or more for the same footing size. That difference alone can mean the gap between a 12-inch footing and a 20-inch one.
- Estimate footing diameter using your per-post load divided by your soil’s bearing capacity, then round up to the next standard size.
- Confirm your local frost depth, footings need to sit below that line, or seasonal freeze-thaw cycles will heave your posts out of alignment over a few winters.
- Frost depth swings widely by region, from a few inches in the mildest climates to several feet in cold-winter areas, so check with your local building department rather than assuming.
- Schedule your footing inspection before backfilling. Most municipalities require the inspector to see the footing hole and forms before you pour concrete.
- Keep documentation of your beam size, species, tributary width, and load assumptions on hand for the inspector. It speeds up approval considerably.
Railing Posts Follow Different Rules Than Structural Posts
Structural posts hold up the deck. Railing posts hold back a person leaning on the rail, and that’s a lateral load problem, not a vertical one.
- Building codes typically require railings to resist a 200-pound concentrated lateral load, which usually forces railing post spacing down to 4 to 6 feet, tighter than most structural post grids.
- You can attach railing posts directly to structural posts where the grid lines up, bolt them to blocking between joists, or mount them to the beam face with rated hardware.
- The cleanest approach is designing your structural grid and railing layout together from the start, so railing posts land on solid blocking or existing structural posts instead of floating between them.
Trying to retrofit a railing layout onto a deck that’s already framed is one of the more common regrets DIY builders run into.
When Does A Deck Need An Engineer Instead Of A Table?
Prescriptive tables cover most backyard decks, but certain situations push you past what IRC R507.5 and DCA-6 were built to handle.
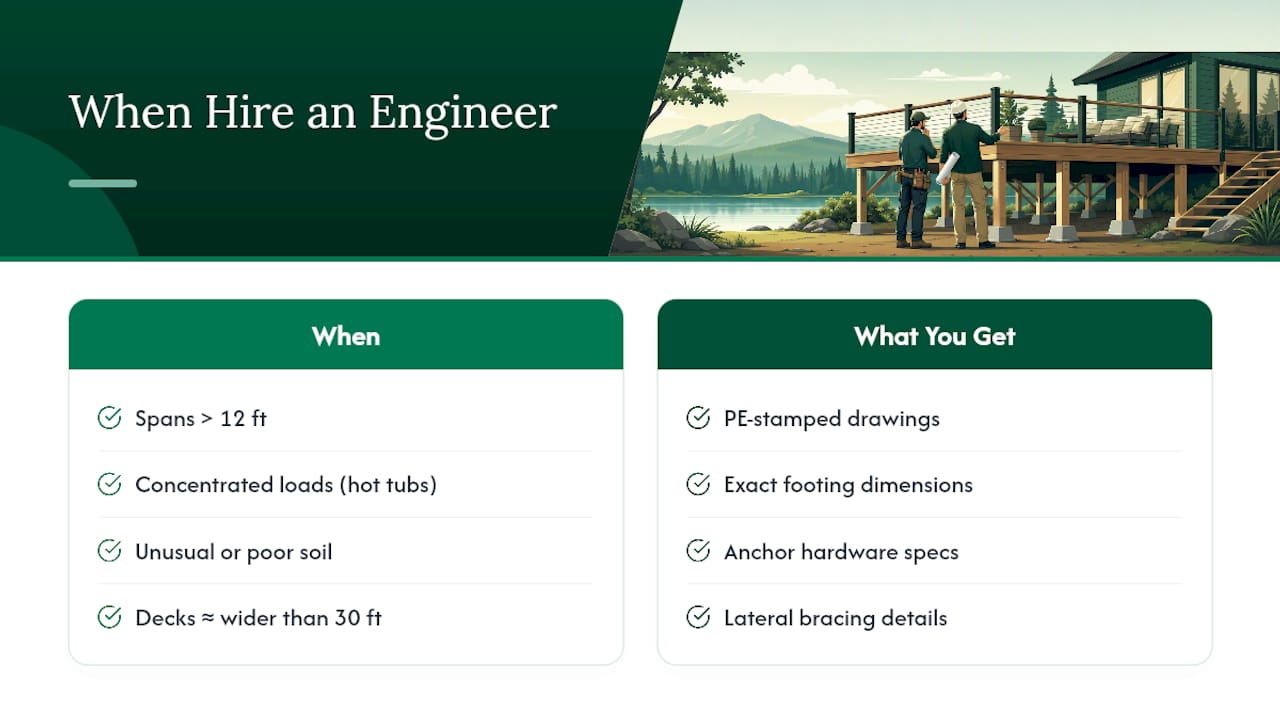
Spans beyond 12 feet, concentrated loads like hot tubs, unusual or poor soil conditions, decks wider than about 30 feet, or multi-story structures all typically require a licensed engineer. What you get for that fee is a PE-stamped drawing set specifying exact footing dimensions, anchor hardware, and lateral bracing, the kind of documentation that clears permitting review without back-and-forth. Firms offering structural engineering services handle exactly this kind of stamped design work when a project exceeds prescriptive limits.
Pro Tip: A dimensioned drawing with your beam size, post spacing, and footing specs already worked out saves your engineer time, and saves you money on their invoice, since less of their billable hours goes toward figuring out what you’re trying to build.
A Field Checklist Worth Following Every Time
Confirm the ledger flashing first, water intrusion there causes more structural failures than undersized posts ever do. Then pick your beam size, calculate tributary width and spacing, size footings to your actual soil, mark the site with batter boards, and call for a footing inspection before you pour.
One habit worth building: don’t over-optimize to shave off a post or two. Adding an extra post is almost always cheaper than upsizing a beam to cover a longer span, and it adds redundancy your deck will thank you for during a heavy snow year. Clear, dimensioned drawings for your contractor or inspector, tools that calculate framing costs can help here, prevent the kind of on-site improvising that leads to rework.
— Christian
Turn Your Deck Plan Into Contractor-Ready Drawings
Property Improvement Estimator cuts out the back-and-forth of vague bids by letting you draw your deck footprint directly on a satellite map of your property first. Instead of guessing at square footage over the phone, you set the exact dimensions, and the platform’s Deck Estimator calculates material and labor estimates based on what you actually drew, not a generic average.

That precision matters once post spacing and footing counts enter the picture, since framing complexity drives cost more than square footage alone. Pair your drawing with local permit factors using the Deck Permit Cost Calculator to see how footing depth and inspection requirements affect your total budget before you ever call a contractor. When you’re ready to move from planning to bidding, start your estimate and get a scope package contractors can quote against without a site visit.
Sources
- AWC DCA-6 Prescriptive Residential Wood Deck Construction Guide
- Deck Post Spacing Calculator (DeckMath)
- Deck footing spacing guide: posts, beams and loads (BuildCalcHub)
Recommended
- Deck Cost Calculator | Materials, Stairs, Railings, Elevation, and Local Costs
- Deck Permit Cost Calculator | Elevation, Footings, Railings, Stairs, and Local Review
- Deck Estimate Calculator | Materials, Stairs, Railings, and Local Factors
- Deck Material Cost Calculator | Decking, Framing, Railings, Stairs, and Local Factors